
Today I want to talk to you about how you can make your own Italian Sausage for starters :)
and then we will get into the pressure canning of the
Italian Sausage & Zucchini in Tomato Sauce

So let's begin, to start with you will need these items to make your own Italian Sausage:

2 pounds ground pork (we process our own hogs so I have the ground pork in 1 pound packages already in my freezer, when I am making my breakfast sausage I leave some plain ground pork for using in these type of recipes)
1 teaspoon black pepper
2 teaspoons dry parsley
1 teaspoon garlic powder
1-1/2 teaspoon Italian seasoning
1/8 teaspoon red pepper flakes
3/4 teaspoon dried fennel seeds
1/2 teaspoon paprika
1 teaspoon minced dried onion
2 teaspoons salt
Mix the above ingredients all together and then fry, drain and set aside. I crumble mine into chunks for the sauce.

2 pounds ground pork

gather your seasonings

measure out your seasonings into a bowl

add seasonings into ground pork and mix well

fry your pork mixture, drain then set aside.
Next get all this stuff together:
Pressure Canner
jar grabber
jar funnel
lid lifter
plastic knife
spoons and ladles
large pots for boiling water
quart jars, seals and bands/rings
hand towels
cloth for wiping down rims before you add seal
pickling and canning salt (optional)
Zucchini, Summer Squash, diced into 1/2 inch cubes
Onions, diced
fresh tomatoes or (like me, my tomatoes are not yet ready) your already canned whole tomatoes or tomato sauce (I used 4 quart jars of my already prepared tomato sauce from pantry & 1 jar of whole tomatoes)
1 can of tomato paste (if needed to thicken)
2 pounds of Italian Sausage
For this recipe you can expect 7-8 quart jars.
Ok the importance of using a pressure canner for certain items such as any meats & certain vegetables, is so you can get the high temperatures you need to kill any bacteria, simply something a water bath canning method cannot do (or reach those high temperatures).
So, lets get started today . . .
Zucchini & Summer Squash, get those picked, washed and the ends cut off, DO NOT PEEL. Dice into 1/2 inch or so cubes/chunks, they WILL get smaller during cooking so I like mine a bit over bite sized to start with.


Inform the cat that she is not welcome on the counter at this time, we do not want kitty fur in the goods!!


After you have all your zucchini and summer squash cubed up, grab that onion from the garden, clean it up and dice it up

It's time to start thinking about heating up those jars, I set up the propane turkey cooker on the back porch for this because I have so much sauce to do today and won't have the space on my stove top

While those get sterilized, you need to get your water added to the pressure canner and set to simmer

I also take this time to add the seals in there to soften the rubber, no need for a special separate sauce pan for these, just add into the pressure canner, keep in mind you do not want the seals boiling, just a simmer is all you need.

There! now everything is getting heated up, it's time to get your tomatoes diced up OR like I did, grab your jars of tomatoes and tomato juice off the pantry shelf and get them dumped into a huge stock pot

at the end of each garden season when I am finished with the sauces I wish to put up, I always process the extra tomatoes into either stewed tomatoes, plain whole tomatoes or tomato juice for times like this when the tomatoes are NOT yet ready in my garden but the zucchini and onions and such are!
I used 5 quart jars off the pantry shelf.

HOWEVER if your garden is ready and you have tomatoes you will need enough tomatoes processed down to make about 48 ounces of tomato puree.
so get that dumped into your stock pot
and add the following spices for your sauce:
1/4 cup chopped green pepper
1 teaspoon garlic powder
1 tablespoon Italian seasoning
1 teaspoon thyme
4 teaspoons salt

Start this stock pot simmering while you mix in your spices, bring up to a boil, stirring often so it doesn't stick.
This is when I add my onion and sausage


Once it comes to a boil add in the big pan of zucchini you have diced up


remember to keep stirring, you may have to add your zucchini in two batches as they cook down allowing more space in your stock pot

keep stirring, you don't want any sticking going on!
I have to cover mine sometimes or it splatters all over the cabinet to the right of my stove! I am a very messy person while canning!!

now that you have it all nice and boiling, leave it to a slow boil for 15 minutes, then it's time to drop down to a nice simmer to hold it hot so you can get your stuff setup and ready to start filling jars!!
Are you with me? Have I lost you yet?

Head to back porch and grab those jars that have been sitting there all sterilized for you (yes it's a pig sty out there!)

grab that seal/lid lifter and make sure you know where it is, I always have mine stuck right on the stove

grab your other things and set up an old towel, because if you are like me you will be a little messy

Hot jars are now ready to be filled
just look at how lovely it has simmered down for us
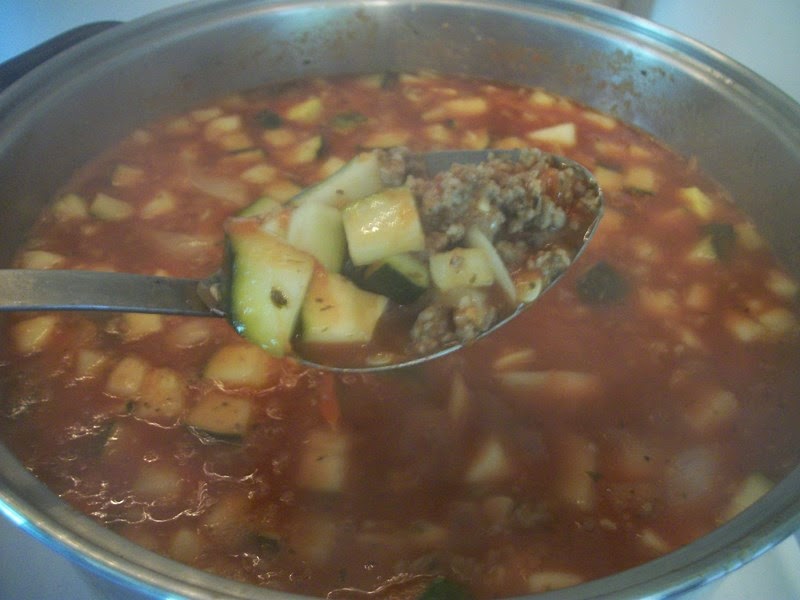

I like to start with a slotted spoon to get at least 3/4 of the jar filled with the goodies, you can press the goodies down firmly and then I add the sauce from the pan using the funnel and ladle

Remember to run the spatula around the jar to release any air bubbles, wipe the rims of the jars from any goo that may have gotten on there
now get into your seals and get your jars sealed up


Remember to check your headspace, leaving 1 inch between the lip of the jar to the food product.

next add your bands, remember ONLY to finger tighten, do not over tighten the bands or your seals may not seal or they may crinkle up on you, by finger tightening I simply mean to use only your fingertips and screw the band on, once the jar starts to move with the band it's time to stop turning!!

As you fill each jar and get the seal and rings onto the jars, gently place them into the pressure canner that you have had water in there simmering this whole time, be sure to double check your water level at this point to be sure it hasn't evaporated, fill canner with your jars as you get them sealed and banded up, mine holds 7 quart jars when filled.
DO NOT ADD THE LID YET

Once you have all your jars filled, sealed and into the pressure canner, it's time for all the excitement :)
Put the lid on and twist it into place, follow your canners instructions, mine just sits down onto the slots and turns and locks into place, do NOT add the weight yet (or do not close the valve if you have that type of pressure canner)


The next important step is to turn up your burner to start that pressure canner to boiling, you need to leave the weight off so that during this time your canner can vent steam, once it's boiling the steam will start escaping out the valve, it's important to allow a steady stream to escape for 10 MINUTES, this gets the air out of the pressure canner, once you have seen a nice steady stream of steam escaping for 10 minutes it's time to add the weight to the valve, it simply just sits right onto the valve.


It's time now to start watching that pressure gauge, your burner should be heating the canner up and the pressure will start building, get the pressure up to 11 pounds, you may have to adjust your burner to keep it at the 11 pounds of pressure, do not allow it to drop below 11 pounds or you will have to start the timing process all over again!!
Once your pressure hits 11 pounds it's time to start the timer, we need 11 pounds of pressure for 90 minutes, so set your timer for 90 minutes.
(or like my timer 1 hour 30 minutes)

While it's building pressure I like to clean up the kitchen a little bit, remember I said I was pretty messy! Remember you have an hour and a half to keep an eye on the pressure gauge but also time to wander a bit too, just not too far

I will have plenty of laundry to do, I just fold these towels over until my canning is finished, this is also why I keep a stash of old hand towels because of the staining they get

there, a little better

I grab up my labeling stuff and get a spot ready out of the heat and any drafts for the jars when I take them from the pressure canner

Once your pressure hits 11 pounds it's time to start the timer, we need 11 pounds of pressure for 90 minutes, so set your timer for 90 minutes.
(or like my timer 1 hour 30 minutes)
While it's building pressure I like to clean up the kitchen a little bit, remember I said I was pretty messy! Remember you have an hour and a half to keep an eye on the pressure gauge but also time to wander a bit too, just not too far
I will have plenty of laundry to do, I just fold these towels over until my canning is finished, this is also why I keep a stash of old hand towels because of the staining they get
there, a little better
I grab up my labeling stuff and get a spot ready out of the heat and any drafts for the jars when I take them from the pressure canner
now may be a good time to look for the cat, to be sure you didn't accidentally can her up in the process!! ehhh she thinks she is hiding!!

alrighty then, back to business, have you been keeping an eye on your pressure gauge? and the timer? I have :)
5 more minutes!!!

I like to set my canner off the stove when it's time to de-pressurize, as the stove is so very hot.

I also had some left over sauce, so instead of one more jar in the canner all by itself, I decided to grab a pork loin and cook the hubby a nice sauced up pork loin for supper, it's in the oven now, fat side up oh yeah!!

ok time is up, set the canner on the cooling rack, do NOT touch anything, leave the weight on and go find sometime to do while you wait for it to drop back down to zero

and the safety release is up, when the gauge drops to zero AND the safety release goes back down is the only time you want to start messing with it

it can take 25 minutes to an hour or better to drop that safety button back down, I take the time to clean up the kitchen during this time, OR get your next batch ready, or read a book!

alright, the safety valve has dropped, the pressure gauge is reading zero, it's time to remove the weight and remove the lid, using pot holders unlatch it and when lifting the lid be sure to open it carefully and away from you so the steam still in there that comes out is not coming up into your face!

5 more minutes!!!
I like to set my canner off the stove when it's time to de-pressurize, as the stove is so very hot.
I also had some left over sauce, so instead of one more jar in the canner all by itself, I decided to grab a pork loin and cook the hubby a nice sauced up pork loin for supper, it's in the oven now, fat side up oh yeah!!
ok time is up, set the canner on the cooling rack, do NOT touch anything, leave the weight on and go find sometime to do while you wait for it to drop back down to zero
and the safety release is up, when the gauge drops to zero AND the safety release goes back down is the only time you want to start messing with it
it can take 25 minutes to an hour or better to drop that safety button back down, I take the time to clean up the kitchen during this time, OR get your next batch ready, or read a book!
alright, the safety valve has dropped, the pressure gauge is reading zero, it's time to remove the weight and remove the lid, using pot holders unlatch it and when lifting the lid be sure to open it carefully and away from you so the steam still in there that comes out is not coming up into your face!
Set the lid aside, grab your jar lifters.
Carefully remove one jar at a time and place onto the hand towel without touching, they need a little air space between jars to cool down.

Leave them alone, you will start hearing the popping sound of the seals actually sealing, you will know when they are sealed by the way the seal has been sucked down onto the jar, using your finger you can push on the lid and it doesn't give any, (or pop up and down) if it does move up and down it means it did not seal properly for whatever reason and you need to put it in the fridge and use within 2 weeks. Some people I know have removed and replaced the seal and processed them all over again, I have never done that, I feel it's way over cooked product and prefer just to use them up within the 2 week time frame.

Leave them alone, you will start hearing the popping sound of the seals actually sealing, you will know when they are sealed by the way the seal has been sucked down onto the jar, using your finger you can push on the lid and it doesn't give any, (or pop up and down) if it does move up and down it means it did not seal properly for whatever reason and you need to put it in the fridge and use within 2 weeks. Some people I know have removed and replaced the seal and processed them all over again, I have never done that, I feel it's way over cooked product and prefer just to use them up within the 2 week time frame.
What a beautiful sight!! son and hubby are snapping beans for me again!!
I snuck a photo through the back screen door :)
I snuck a photo through the back screen door :)
Don't forget to label your new canned goodies with the date!
what's next on my to-do list you ask?
why ONIONS of course!
So the family and I will see you back here next time when I talk about the onions we just harvested :)

what's next on my to-do list you ask?
why ONIONS of course!
So the family and I will see you back here next time when I talk about the onions we just harvested :)
No comments:
Post a Comment